Step 5: Work with pictures
6 min read
You can spend five minutes describing what is wrong with a screen, or you can show the agent the screenshot. Showing it is faster, and it is exact - there is no gap between what you saw and what you managed to put into words.
There is one idea underneath every way of doing it, and it is worth having before the steps. An agent reads a picture the same way it reads your code: as a file on the machine it is running on. So each route below is doing the same job - get the file onto that machine, and put its path in the prompt. Once you have seen that, your desk, your browser and your phone stop being three separate features and become one habit.
Six minutes. You need DevThrottle open with one session running, and a picture worth showing it - a screenshot of the thing that looks wrong, a design, a photo of a whiteboard.
Drag the picture onto the prompt bar
Find the image in your file manager and drag it onto the prompt bar - the same box under the terminal you have been typing into. Its full path is inserted where your cursor was, followed by a new line. Nothing is uploaded and no second copy is made: the agent is running on this machine, so it opens the picture where it already lies.
Now write the sentence that goes with it - the button in this screenshot is behind the header - and send it the way you always do. The path is just words in your message, so it can sit anywhere in the sentence.
One picture per drag. If you grab several files at once, the first one is the one that lands.
Check it is the right picture before it goes
A path is not a picture, and screenshots taken a minute apart have names that look identical. Press Expand, in the top-right corner of the prompt bar, and the large editor opens with a preview beside your text in which a line that is a path to an image appears as the image itself. Look at it, then Apply and send.
This is worth doing the first few times. Sending the wrong screenshot is not an error anybody catches - the agent answers confidently about a picture you did not mean to show it.
Let the Screenshots panel save you the trip
The panel on the right of the Director opens on its Screenshots tab: the newest pictures in one folder on this machine, each a thumbnail with the time it was written and a row of buttons. Drag a thumbnail onto the prompt bar and you get its path, exactly as in the first step, without opening a file manager at all.
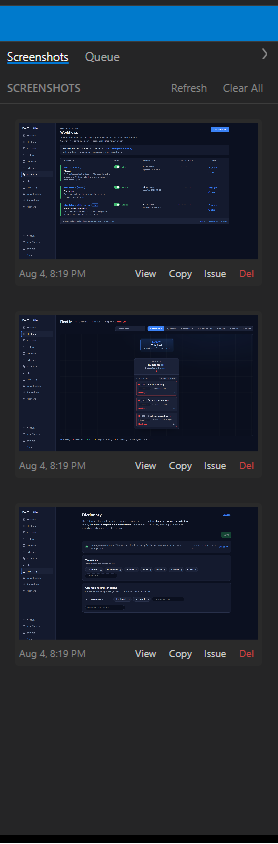
The Director's right-hand panel on its Screenshots tab, beside a Queue tab: a SCREENSHOTS header with Refresh and Clear All, then three recent pictures as thumbnails, each with the time it was written and View, Copy, Issue and Del Which folder it watches is a setting, and it is the one part of this step that needs your attention: until that setting has been given a folder, the panel is not watching the one your own screenshots go to. It watches a folder the Director keeps inside its own data folder - the one pictures uploaded from a browser or a phone are filed into.
So point it at yours. Open Settings - Directories, press Detect, which fills in the folder this operating system saves screenshots to, or Browse to choose one yourself, then Save. The panel re-points immediately, with no restart. The setup wizard asks the same question, so on some machines it is already done, and that settings box shows you what it is set to today.
Once it points at your own folder, take a screenshot however you normally take one and it is in the panel a moment later, ready to drag. If one you have just taken never turns up, that setting is the first thing to look at.
Paste one - in the browser
Open the same session in the Cockpit and its message box takes a picture three ways: drag one onto the box, paste one into it, or press Attach and pick a file. All three do the same thing - the picture is uploaded from the device you are sitting at to the machine the session runs on, saved there, and its saved path dropped into the box, with Image attached confirming it. Add your sentence around the path and send.
Paste is the one to make a habit of: take a screenshot to the clipboard, click into the box, Ctrl+V. Pasting ordinary text behaves exactly as it always did - only a picture on the clipboard is treated as an attachment.
At your desk it is the other way round. Pasting a picture into the Director's prompt bar does not attach it - drag the file in, or drag it out of the Screenshots panel. Copying a screenshot to the clipboard and pressing Ctrl+V is the reflex most people arrive with, so it is worth knowing before you try it and wonder what you did wrong.
Send a photo from your phone
You are standing in front of the screen that is wrong, or a whiteboard someone just filled. Open the session on your phone and press Attach: the phone's own picker opens, offering the camera and your photo library, so you can take the photo there and then or pick the screenshot you took ten minutes ago.
What happens next is the same shape as everywhere else, and one detail in it is worth being exact about. The photo does not go into the session. It is uploaded to the machine that session is running on, filed into that Director's screenshots folder, and the path where it landed is what arrives at your cursor. Add your sentence and send.
So a photo you sent from a train is now a file on the machine at home, and the agent has been told where. Whether it also appears in the Screenshots panel there depends on what your phone photographs in - see the note below.
Find the picture the agent made
Pictures come back the other way too - a chart it plotted, a page it rendered, a screenshot it took of your app. Do not go hunting for the file: ask the agent to print the path. Nothing obliges an agent to say where it wrote something, and they often do not, so make asking the first move rather than the thing you try after five minutes of looking.
Once the path is on the screen, click it. In the Director, the small menu that opens offers View File and the image opens in the app. In the browser, clicking a path in Terminal or Chat opens it in place with a Download button. On your phone, tap it.
.heic sends a file that is accepted and saved on that machine, with its path handed over exactly as any other picture's would be - and that neither the panel at your desk nor the gallery in the browser will list. So if a picture is not where you expect it, open the folder itself before concluding it never arrived. Whether your agent can then open a .heic is its own affair, as it is for any image. Which surface recognises what is on Working with pictures.The rest of it
The Copy and Issue buttons under each thumbnail, exactly which file types each panel shows and which ones Clear All deletes, and the full set of routes in one place are all on Working with pictures, which is the deeper version of this step. For the prompt bar itself - why the box you dropped the picture into is not the terminal above it - see The prompt bar is not the terminal.
Next
You can show an agent something instead of describing it, from your desk, a browser or your pocket. The next step is the one that makes an agent trustworthy: seeing exactly what it changed in your code, reading the real difference, and deciding to keep it.
That is See what changed.